Deploy a Go API and a React frontend on one domain with CorePanel
Publish a React app and its Go API under one hostname, with MySQL, HTTPS, automatic rollback and your domain's email accounts, all managed from the CorePanel panel.

This tutorial puts a small web application on your server the way most modern ones are built: a React frontend and a Go API behind it, with a MySQL database. Both live under one hostname:
https://app.example.com/ → the React build (static files)https://app.example.com/notes/42 → the React build too: client-side routinghttps://app.example.com/api/notes → the Go programThe example is a notes app, small enough to read in one sitting. Everything that matters for a real project is here: the API reads its port and its database from the environment, the frontend calls it on a relative path, and a broken release never takes the site down.
You do it all from the panel. CorePanel writes the systemd unit, runs the program as the
account’s user in its own network namespace, puts HTTPS and the WAF in front of it, and
rolls a release back on its own if it does not answer. After each screen you also get the
corepanel command that does the same, for when you would rather script it.
You need:
- A server with CorePanel and the account
example(domainexample.com) from Install CorePanel and host your first website. - On your own computer: Go 1.22 or newer, Node.js 20 or newer,
and
zip.
Let the account run applications
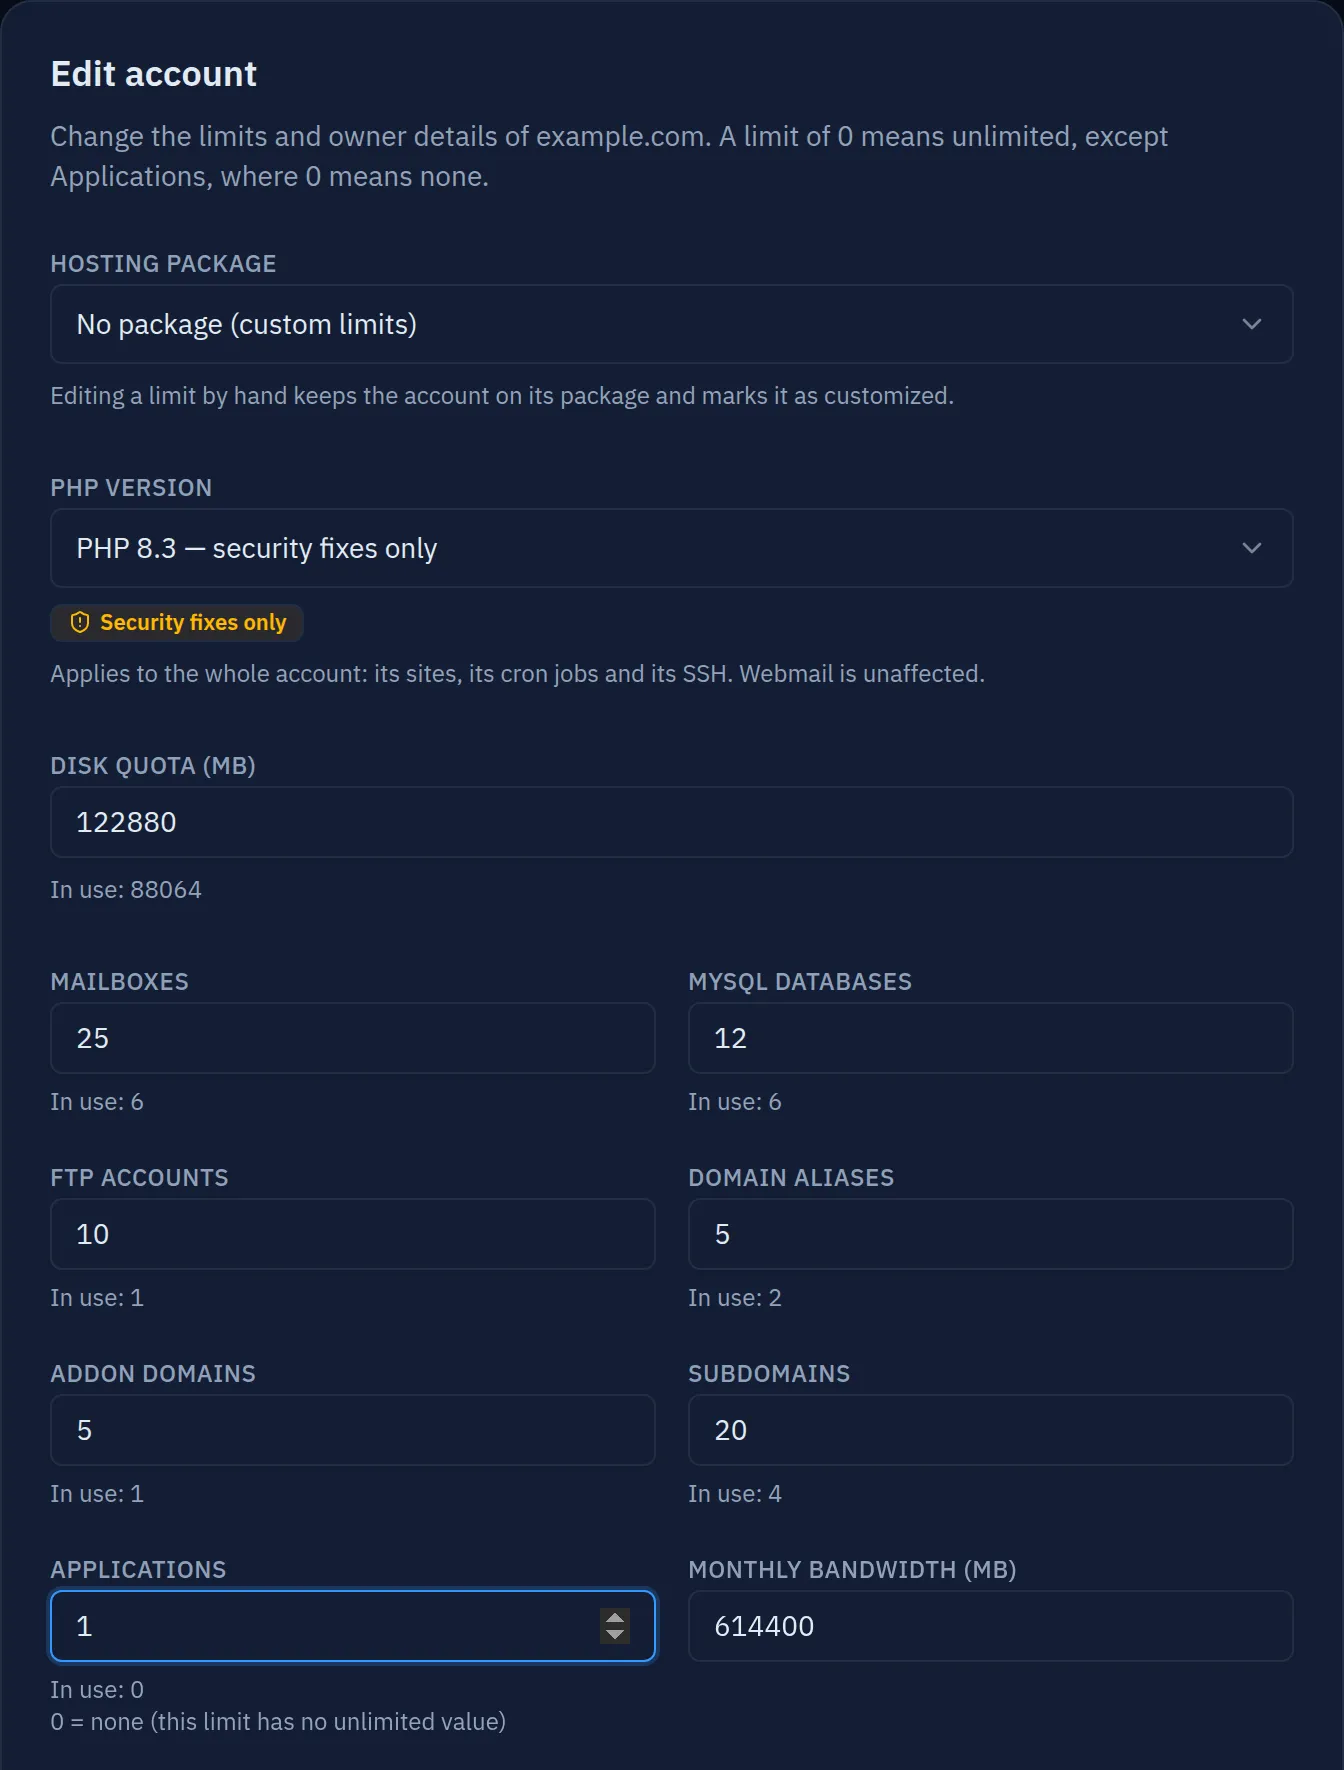
Applications are off for every account until you turn them on. Open Accounts →
example → Overview → Edit account and set Applications to 1.
Here 0 means none, not unlimited, unlike every other limit in CorePanel. Until you
raise it, Add application stays disabled and says why.
Or, from the command line, as root on the server:
corepanel account update example --max-apps 1Create the subdomain in SPA mode
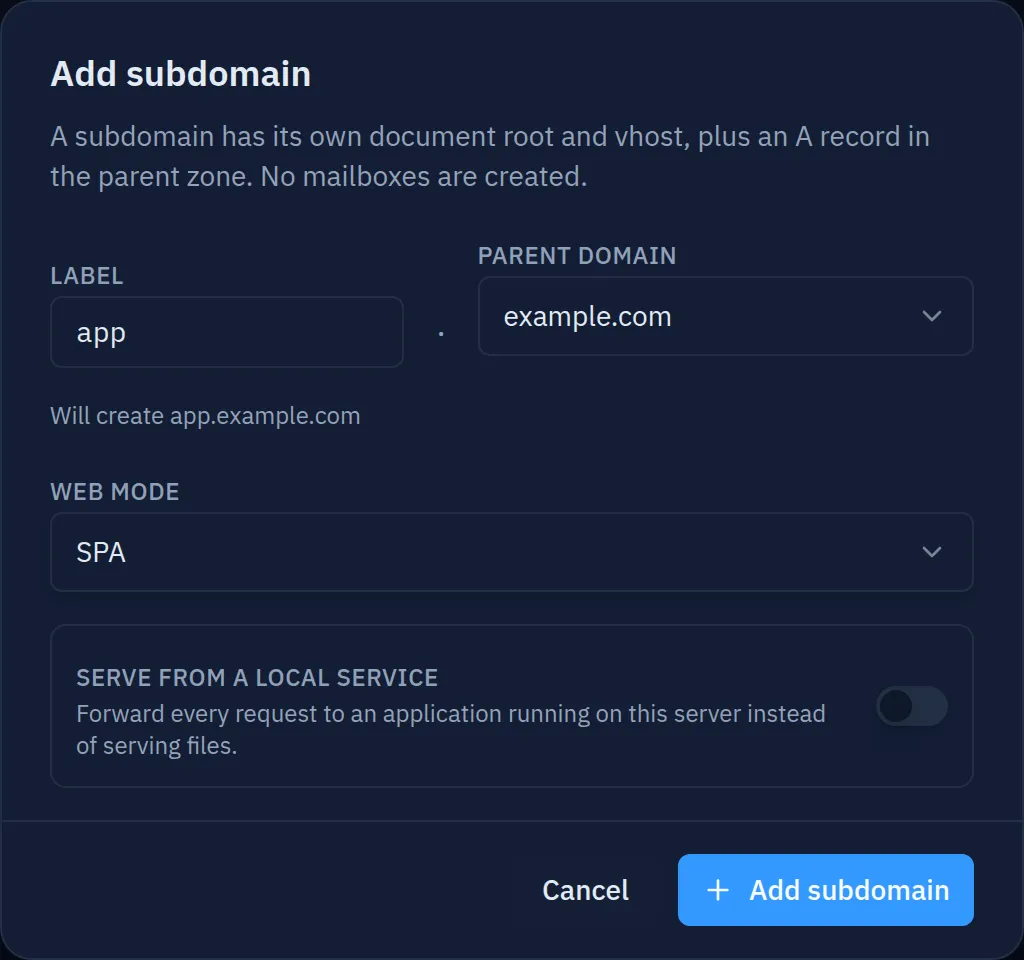
In the account, open Subdomains → Add subdomain: label app, parent domain
example.com, and Web mode: SPA.
SPA mode decides what happens to a path that is not a file. In the default mode,
reloading https://app.example.com/notes/42 would return 404, because there is no
notes/42 file. In SPA mode it returns index.html, and React’s router takes it from
there.
Or, from the command line, as root on the server:
corepanel subdomain add example app example.com --web-mode spaThe subdomain gets its document root at ~/domains/app.example.com and is covered by
the domain’s certificate, so HTTPS works from the first request.
Write the API in Go
On your computer, make a folder for the project and one for the API:
mkdir -p ~/notes/apicd ~/notes/apigo mod init notesgo get github.com/go-sql-driver/mysql@v1.8.1Then create main.go in that folder:
package main
import (  "database/sql"  "encoding/json"  "log"  "net/http"  "os"
  _ "github.com/go-sql-driver/mysql")
type note struct {  ID   int64  `json:"id"`  Text string `json:"text"`}
func main() {  // CorePanel writes the connection here when the app is given a database.  db, err := sql.Open("mysql", os.Getenv("DATABASE_URL"))  if err != nil {    log.Fatal(err)  }  if _, err := db.Exec(`CREATE TABLE IF NOT EXISTS notes (    id   BIGINT AUTO_INCREMENT PRIMARY KEY,    text VARCHAR(500) NOT NULL)`); err != nil {    log.Fatal(err)  }
  mux := http.NewServeMux()
  // Asked after every deploy: a release that cannot reach its database is not serving.  mux.HandleFunc("GET /healthz", func(w http.ResponseWriter, r *http.Request) {    if err := db.PingContext(r.Context()); err != nil {      http.Error(w, "database unreachable", http.StatusServiceUnavailable)      return    }    w.Write([]byte("ok\n"))  })
  mux.HandleFunc("GET /notes", func(w http.ResponseWriter, r *http.Request) {    rows, err := db.QueryContext(r.Context(), "SELECT id, text FROM notes ORDER BY id DESC")    if err != nil {      http.Error(w, err.Error(), http.StatusInternalServerError)      return    }    defer rows.Close()    notes := []note{}    for rows.Next() {      var n note      if err := rows.Scan(&n.ID, &n.Text); err != nil {        http.Error(w, err.Error(), http.StatusInternalServerError)        return      }      notes = append(notes, n)    }    json.NewEncoder(w).Encode(notes)  })
  mux.HandleFunc("GET /notes/{id}", func(w http.ResponseWriter, r *http.Request) {    var n note    err := db.QueryRowContext(r.Context(), "SELECT id, text FROM notes WHERE id = ?",      r.PathValue("id")).Scan(&n.ID, &n.Text)    if err == sql.ErrNoRows {      http.NotFound(w, r)      return    }    if err != nil {      http.Error(w, err.Error(), http.StatusInternalServerError)      return    }    json.NewEncoder(w).Encode(n)  })
  mux.HandleFunc("POST /notes", func(w http.ResponseWriter, r *http.Request) {    var n note    if err := json.NewDecoder(r.Body).Decode(&n); err != nil || n.Text == "" {      http.Error(w, "send {\"text\": \"...\"}", http.StatusBadRequest)      return    }    res, err := db.ExecContext(r.Context(), "INSERT INTO notes (text) VALUES (?)", n.Text)    if err != nil {      http.Error(w, err.Error(), http.StatusInternalServerError)      return    }    n.ID, _ = res.LastInsertId()    w.WriteHeader(http.StatusCreated)    json.NewEncoder(w).Encode(n)  })
  port := os.Getenv("PORT")  log.Printf("listening on :%s", port)  log.Fatal(http.ListenAndServe(":"+port, mux))}
Three things in it are what CorePanel expects from any application:
- It listens on
$PORT. CorePanel sets it to the internal port you choose in the panel. The port only exists inside the application’s own network namespace: nothing else on the server can reach it, and the web server talks to the program through a unix socket. - It reads its database from
DATABASE_URL. You will not write that value anywhere. CorePanel creates the database and puts the connection in the environment. - It has a health path. After every deploy CorePanel requests
/healthz, and only a release that answers200gets published.
Look at the routes: /notes, not /api/notes. The application will be mounted at
/api, and CorePanel strips that prefix before the request reaches it. A visitor’s
/api/notes/42 arrives as /notes/42, so the same binary works at any mount path.
Build it for the server and pack it:
CGO_ENABLED=0 GOOS=linux GOARCH=amd64 go build -o server .tar czf api.tar.gz serverCGO_ENABLED=0 makes a static binary that runs on any RHEL-family release, whatever
glibc your computer has. Use GOARCH=arm64 if the server is an ARM machine. The
.tar.gz holds the built program: CorePanel does not compile anything, and today it
runs Go binaries only.
Register the application
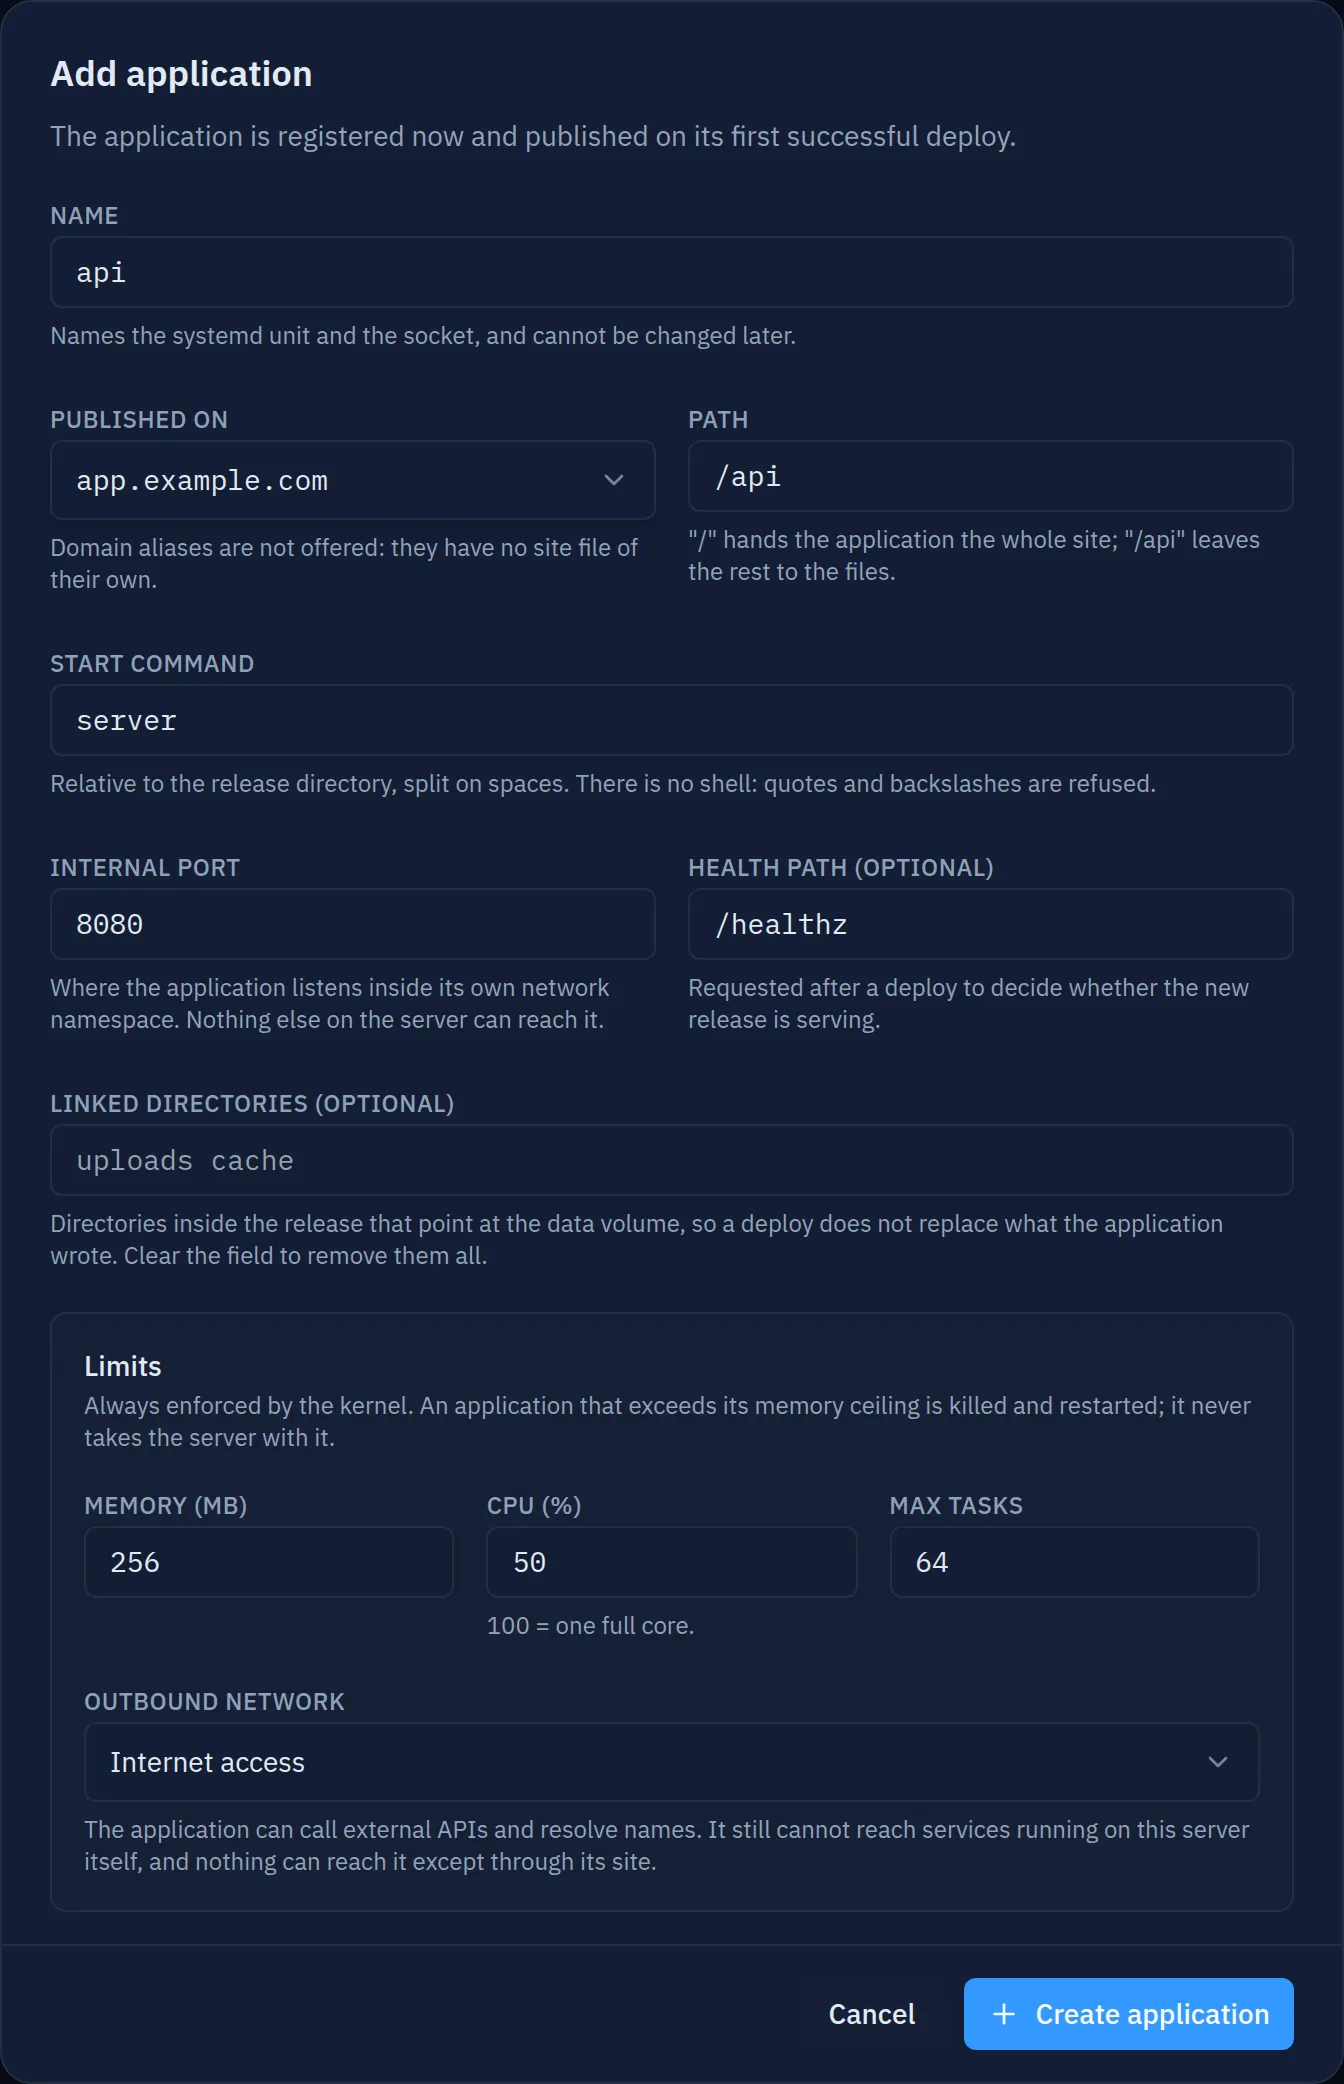
In the account, open Advanced → Applications → Add application and fill in:
| Field | Value |
|---|---|
| Name | api |
| Published on | app.example.com |
| Path | /api |
| Start command | server (the binary’s name, with no ./ in front) |
| Internal port | 8080 |
| Health path | /healthz |
Leave the limits at their defaults: 256 MB of memory and half a core are plenty for this API. On Personal they are fixed.
Or, from the command line, as root on the server:
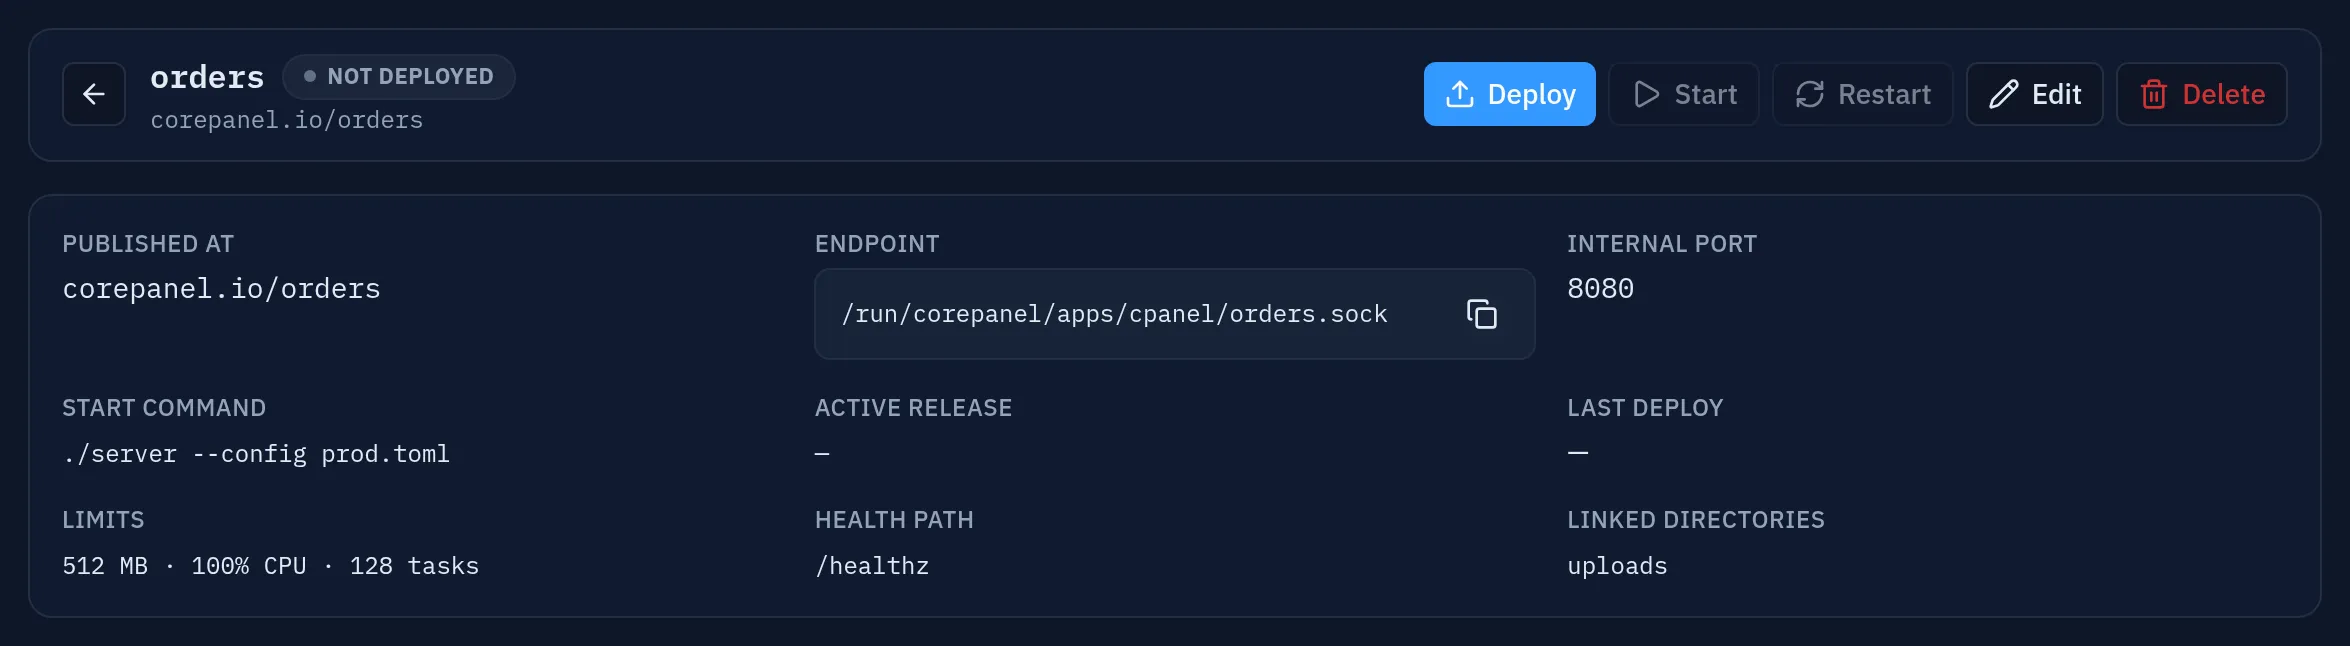
corepanel app create example api --domain app.example.com --path /api --port 8080 --health /healthz -- serverThe application now exists but serves nothing yet: its state is Not deployed, and
Start and Restart are greyed out until there is a release. That is on purpose.
Publishing /api before something answers there would only return 502.
Or, from the command line, as root on the server:
corepanel app show example apiGive it a database
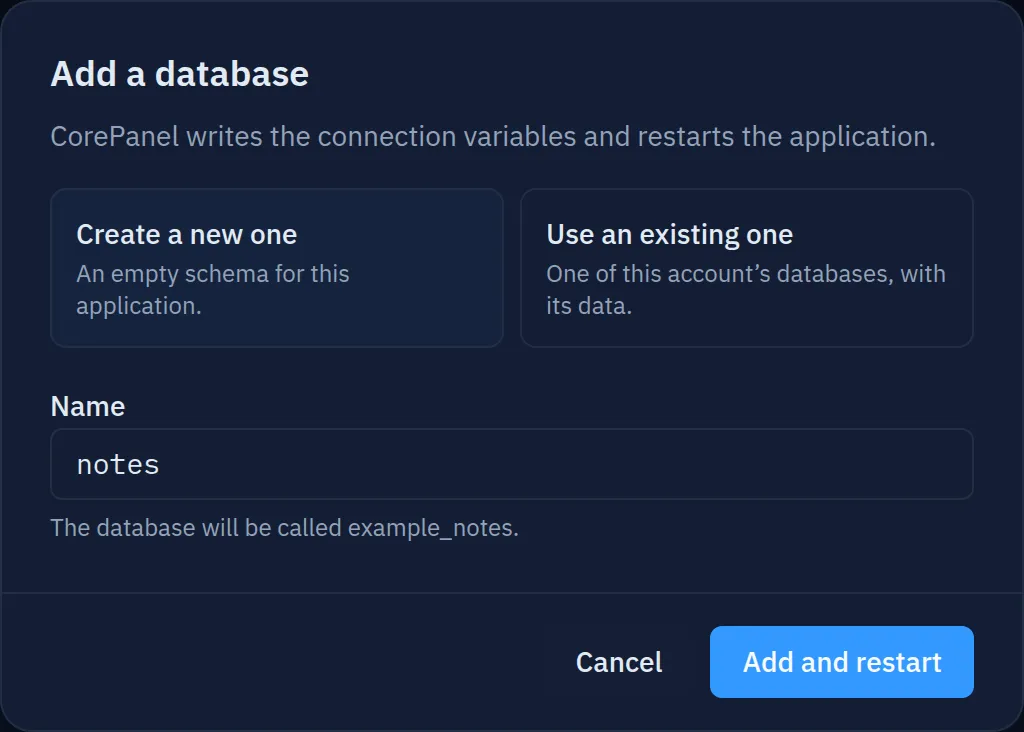
On the application’s page, in the Database card, press Add a database, keep
Create a new one, name it notes and press Add and restart. CorePanel creates the
schema example_notes, a MySQL user for the application only, and its password.
Or, from the command line, as root on the server:
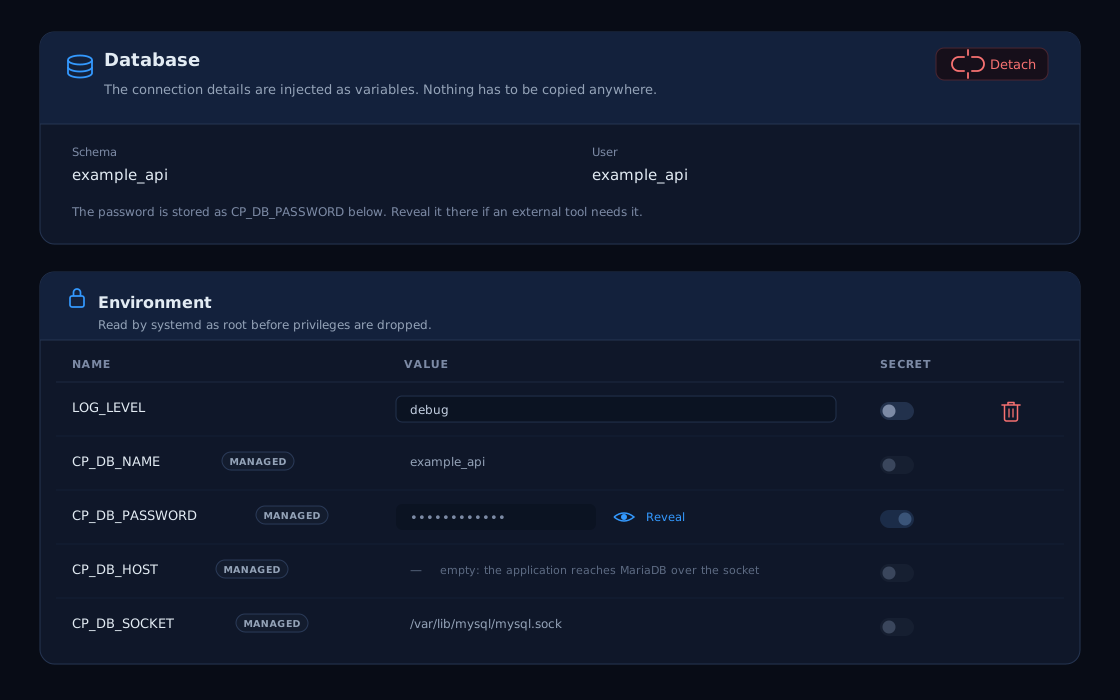
corepanel app database create example api --name notesThe Environment card below now lists the connection, each variable with a Managed badge:
Or, from the command line, as root on the server:
corepanel app env list example apiDATABASE_URL is already in the format the Go driver reads:
example_api:…@unix(/var/lib/mysql/mysql.sock)/example_notes. That is a unix socket,
not 127.0.0.1:3306. The application runs in a private network namespace with no route
to the server’s loopback, so the socket is how it reaches MariaDB, and CP_DB_HOST is
empty on purpose. If you build the connection yourself from the CP_DB_* variables, use
CP_DB_SOCKET.
Deploy the API
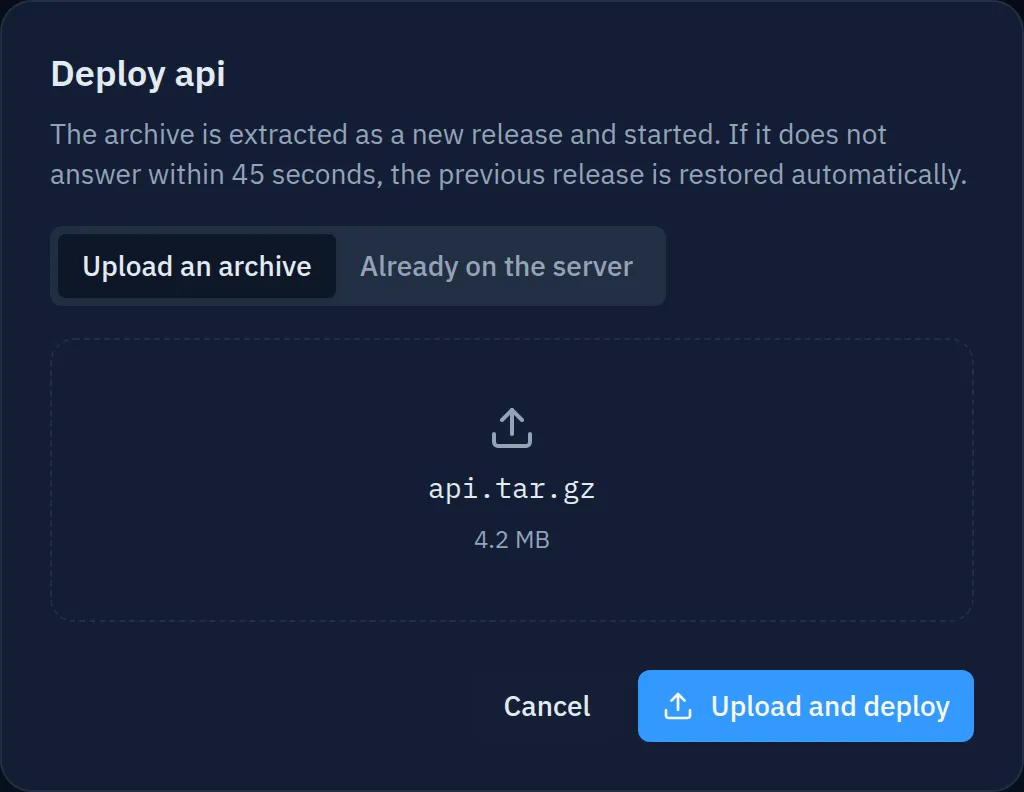
On the application’s page, press Deploy, keep Upload an archive, drop
api.tar.gz on the dialog and press Upload and deploy.
Or, from the command line, upload the archive over FTPS as the account and deploy it as root on the server. A hosting account has no shell unless you grant it one (see below), so the upload goes over FTPS or SFTP:
curl --ssl-reqd --ftp-create-dirs -T api.tar.gz --user 'example:<ftp password>' ftp://example.com/apps/api.tar.gzcorepanel app deploy example apiThe upload goes in pieces with a progress bar, and the deploy starts on its own when the
last piece lands. CorePanel extracts the archive as a new release, starts it, requests
/healthz, and only then publishes /api on the subdomain. The dialog ends with
Deploy complete and the name of the release now serving.
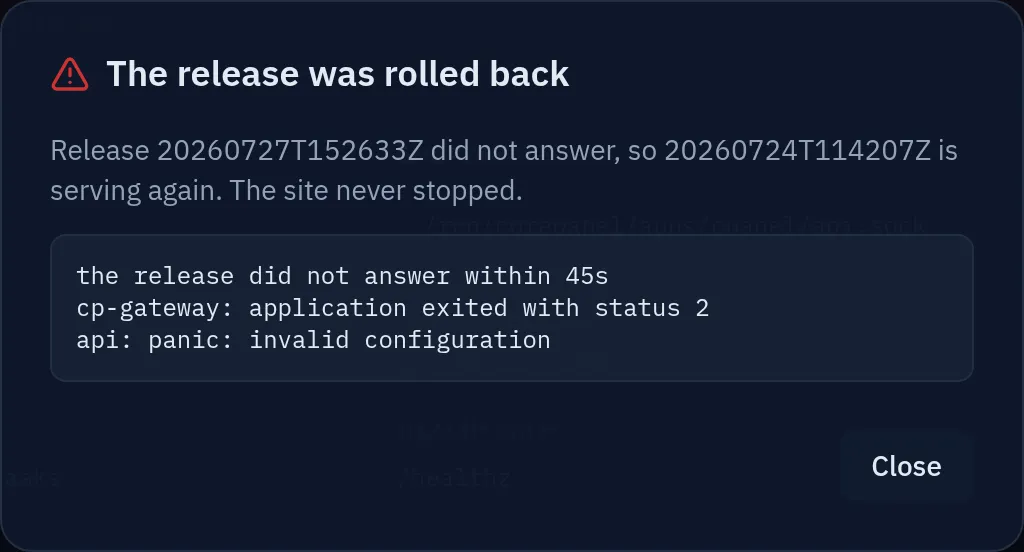
If the release does not answer within 45 seconds (a typo in the start command, a crash at startup, a database it cannot reach), the dialog says so instead, with the end of the program’s log, and the previous release keeps serving:
Or, from the command line, as root on the server:
corepanel app releases example apicorepanel app logs example api -n 50That is the safety net, not an error: visitors never saw the broken release. On the very first deploy there is no previous release, so the application simply stays unpublished until a release answers.
Open https://app.example.com/api/healthz in your browser. It answers ok, through the
web server, with HTTPS and the WAF in front of the program.
Build the React frontend
Back on your computer, next to the API, make a folder for the frontend. The four files below are a complete Vite app: a list of notes, a form, and a page per note.
mkdir -p ~/notes/web/srccd ~/notes/webpackage.json pins React and Vite:
{ "name": "notes-web", "private": true, "type": "module", "scripts": { "dev": "vite", "build": "vite build" }, "dependencies": { "react": "19.1.0", "react-dom": "19.1.0" }, "devDependencies": { "vite": "6.3.5", "@vitejs/plugin-react": "4.5.2" }}vite.config.js sends /api to the Go program while you develop:
import { defineConfig } from 'vite';import react from '@vitejs/plugin-react';
export default defineConfig({  plugins: [react()],  // In development, do what CorePanel does in production: send /api to the Go  // program and strip the prefix.  server: {    proxy: {      '/api': { target: 'http://localhost:8080', rewrite: (p) => p.replace(/^\/api/, '') },    },  },});
index.html is the page React mounts on:
<!doctype html><html lang="en"> <head> <meta charset="UTF-8" /> <meta name="viewport" content="width=device-width, initial-scale=1.0" /> <title>Notes</title> </head> <body> <div id="root"></div> <script type="module" src="/src/main.jsx"></script> </body></html>And src/main.jsx is the app:
import { StrictMode, useEffect, useState } from 'react';import { createRoot } from 'react-dom/client';
// A two-page router in ten lines: enough to show why the server needs SPA mode.function usePath() {  const [path, setPath] = useState(location.pathname);  useEffect(() => {    const onPop = () => setPath(location.pathname);    addEventListener('popstate', onPop);    return () => removeEventListener('popstate', onPop);  }, []);  const go = (to) => { history.pushState(null, '', to); setPath(to); };  return [path, go];}
function Link({ to, go, children }) {  return <a href={to} onClick={(e) => { e.preventDefault(); go(to); }}>{children}</a>;}
function NoteList({ go }) {  const [notes, setNotes] = useState([]);  const [text, setText] = useState('');  const load = () => fetch('/api/notes').then((r) => r.json()).then(setNotes);  useEffect(() => { load(); }, []);
  async function add(e) {    e.preventDefault();    await fetch('/api/notes', {      method: 'POST',      headers: { 'Content-Type': 'application/json' },      body: JSON.stringify({ text }),    });    setText('');    load();  }
  return (    <>      <form onSubmit={add}>        <input value={text} onChange={(e) => setText(e.target.value)} placeholder="Write a note" required />        <button>Add</button>      </form>      <ul>        {notes.map((n) => <li key={n.id}><Link to={`/notes/${n.id}`} go={go}>{n.text}</Link></li>)}      </ul>    </>  );}
function Note({ id, go }) {  const [note, setNote] = useState();  useEffect(() => {    fetch(`/api/notes/${id}`).then((r) => (r.ok ? r.json() : null)).then(setNote);  }, [id]);  return (    <>      <p><Link to="/" go={go}>← All notes</Link></p>      <p>{note === undefined ? 'Loading…' : note ? note.text : 'Not found.'}</p>    </>  );}
function App() {  const [path, go] = usePath();  const match = path.match(/^\/notes\/(\d+)$/);  return (    <main>      <h1>Notes</h1>      {match ? <Note id={match[1]} go={go} /> : <NoteList go={go} />}    </main>  );}
createRoot(document.getElementById('root')).render(<StrictMode><App /></StrictMode>);
The frontend calls the API on relative paths, /api/notes. The page and the API share
one origin, so there is no CORS to configure and no API address to change between
development and production. The proxy in vite.config.js gives npm run dev the same
layout on your computer.
Build it, and zip the contents of dist/:
npm installnpm run buildcd distzip -qr ../web.zip .cd ..Upload the frontend with the File Manager
In the account, open File manager and pick app.example.com under Places. That is
the subdomain’s document root, ~/domains/app.example.com. Then:
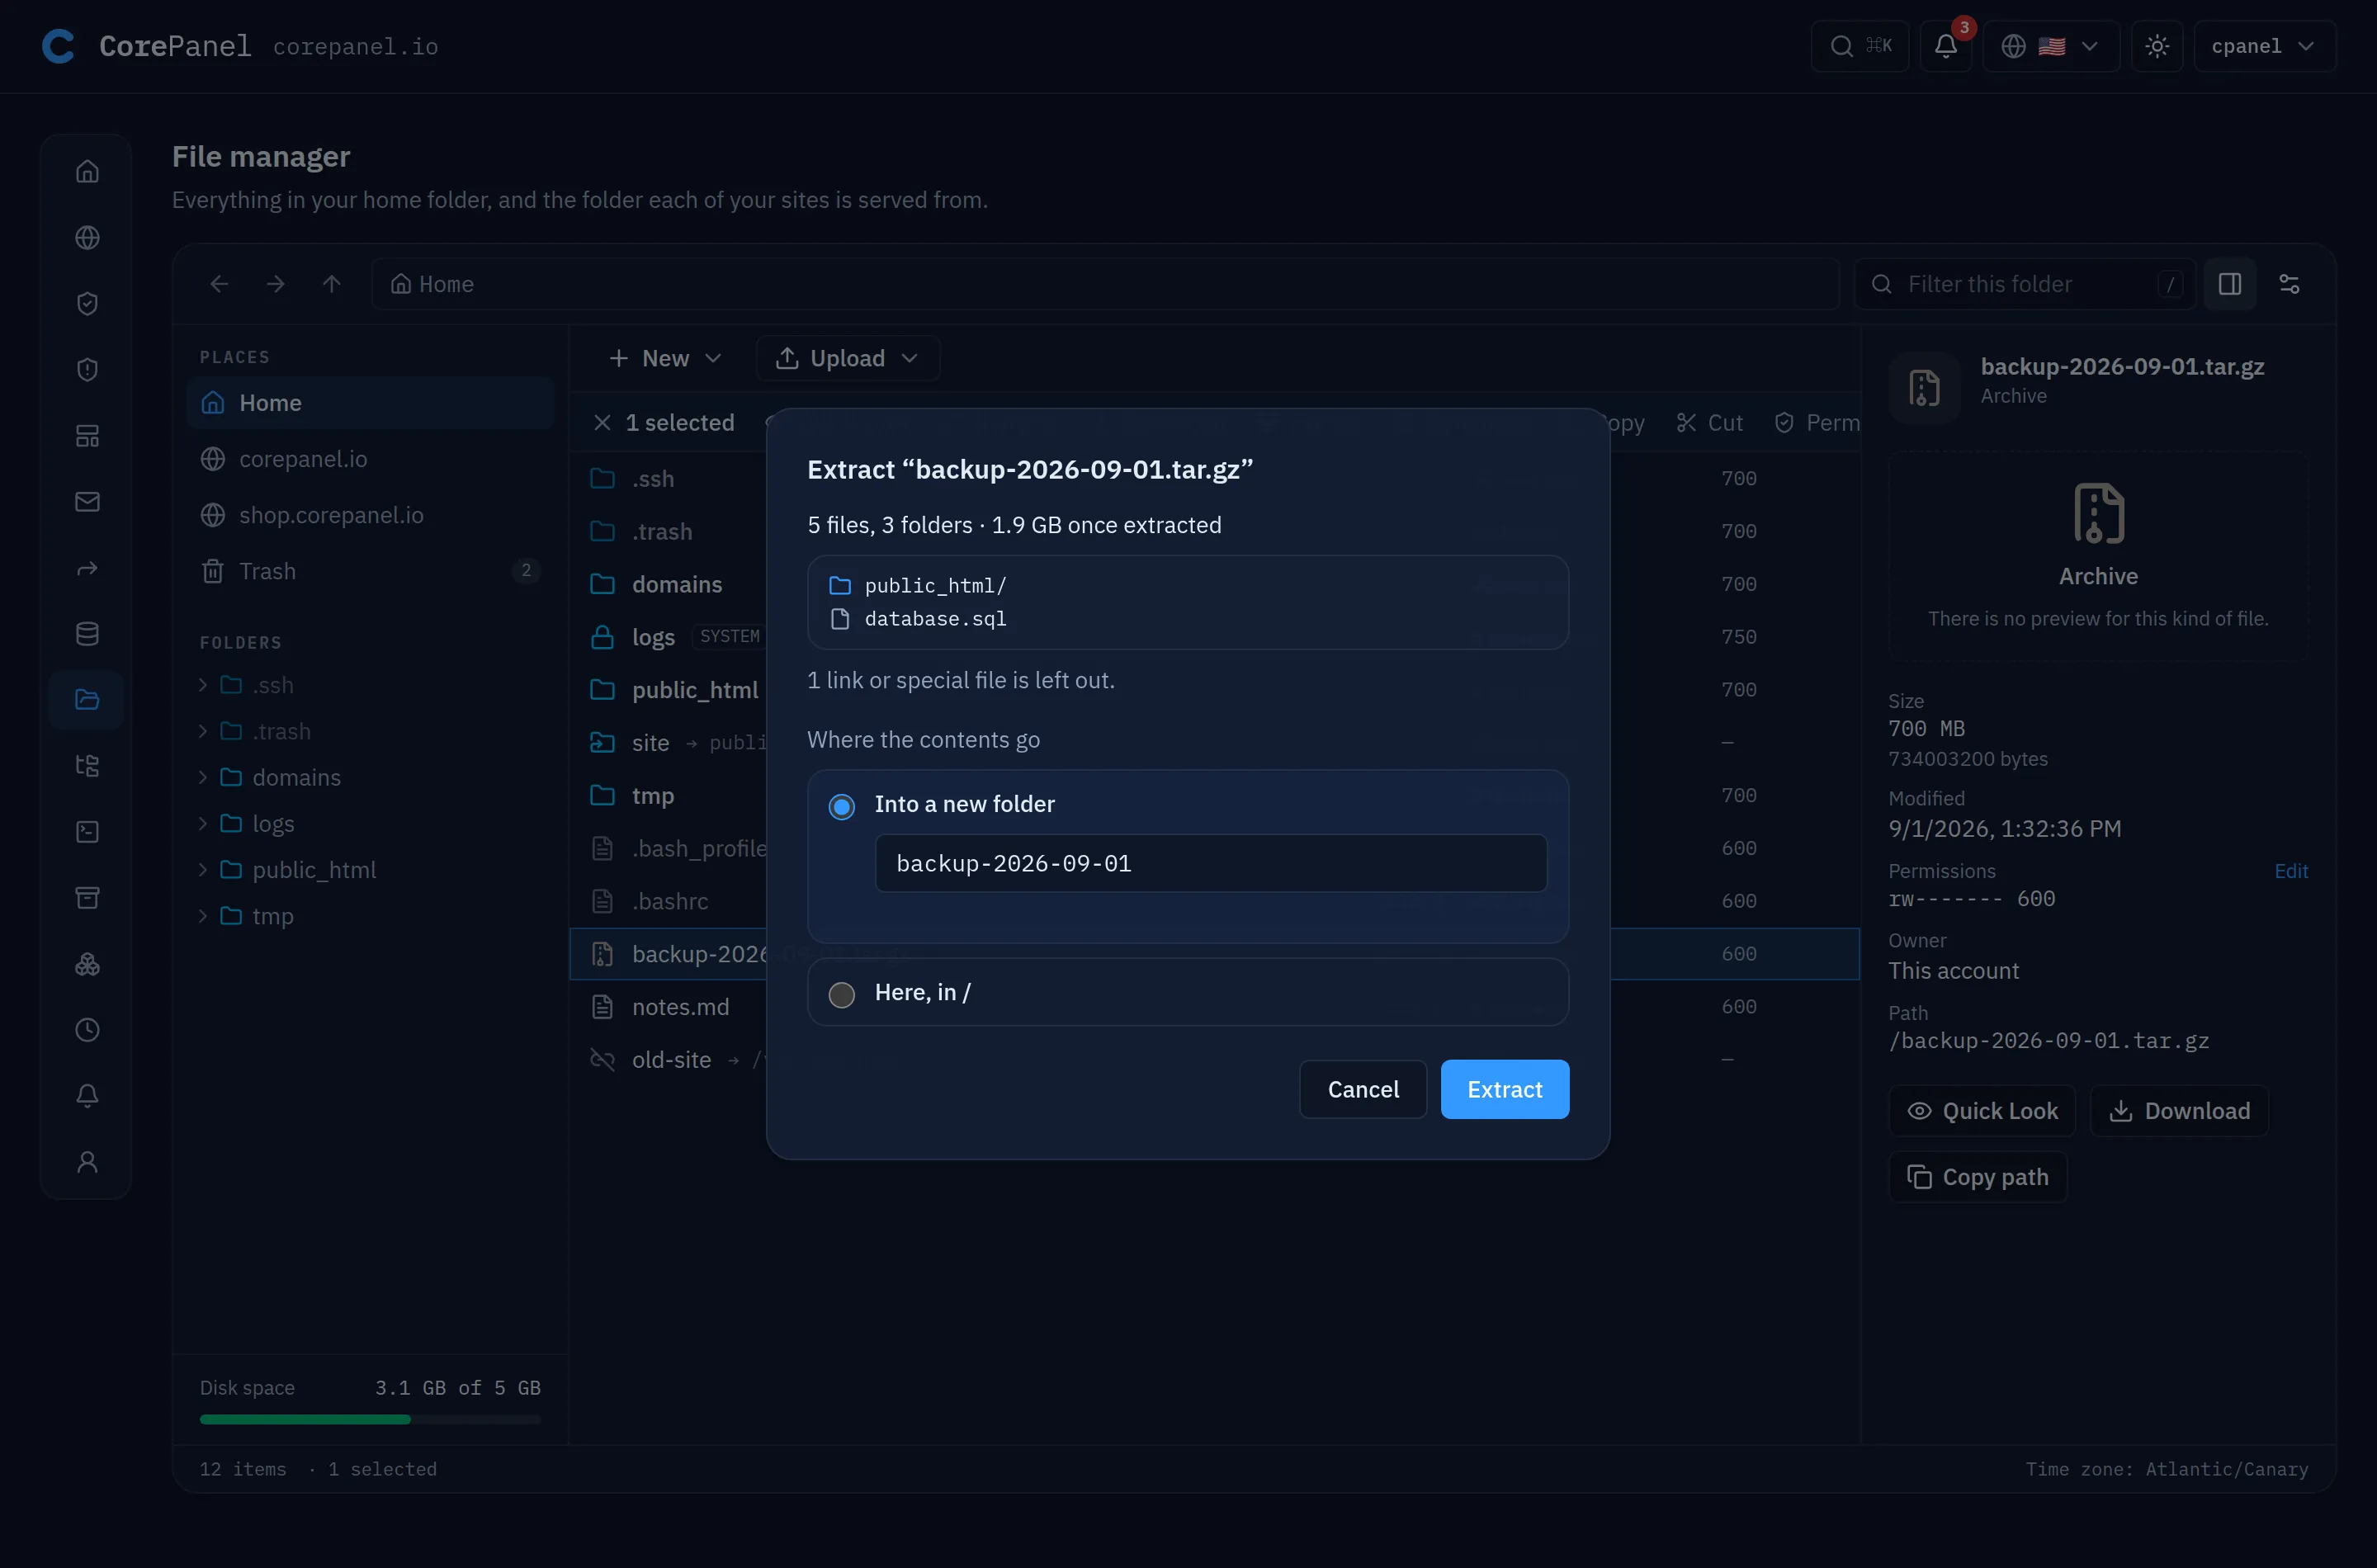
- Upload ▾ → Upload files… and choose
web.zip. - Select it and press Extract. Under Where the contents go, choose Here, so
index.htmlandassets/land in the document root itself rather than in awebfolder. - Move
web.zipto the trash.
Or, from the command line, the same upload over FTPS from your computer:
lftp -u 'example,<ftp password>' -e 'set ftp:ssl-force true; mirror -R dist domains/app.example.com; bye' example.comUploads and extractions run as the account, exactly as an FTP upload would, so every file
belongs to example. To publish a new version of the frontend later, do the same and
choose Replace when it asks about names that are already there.
Check the whole thing
Open https://app.example.com, add a note such as Hello from Go, click it to open its
page, and reload that page. It comes back, because SPA mode served index.html and
React read the path.
If you prefer to check from a terminal on your computer, the same round trip is:
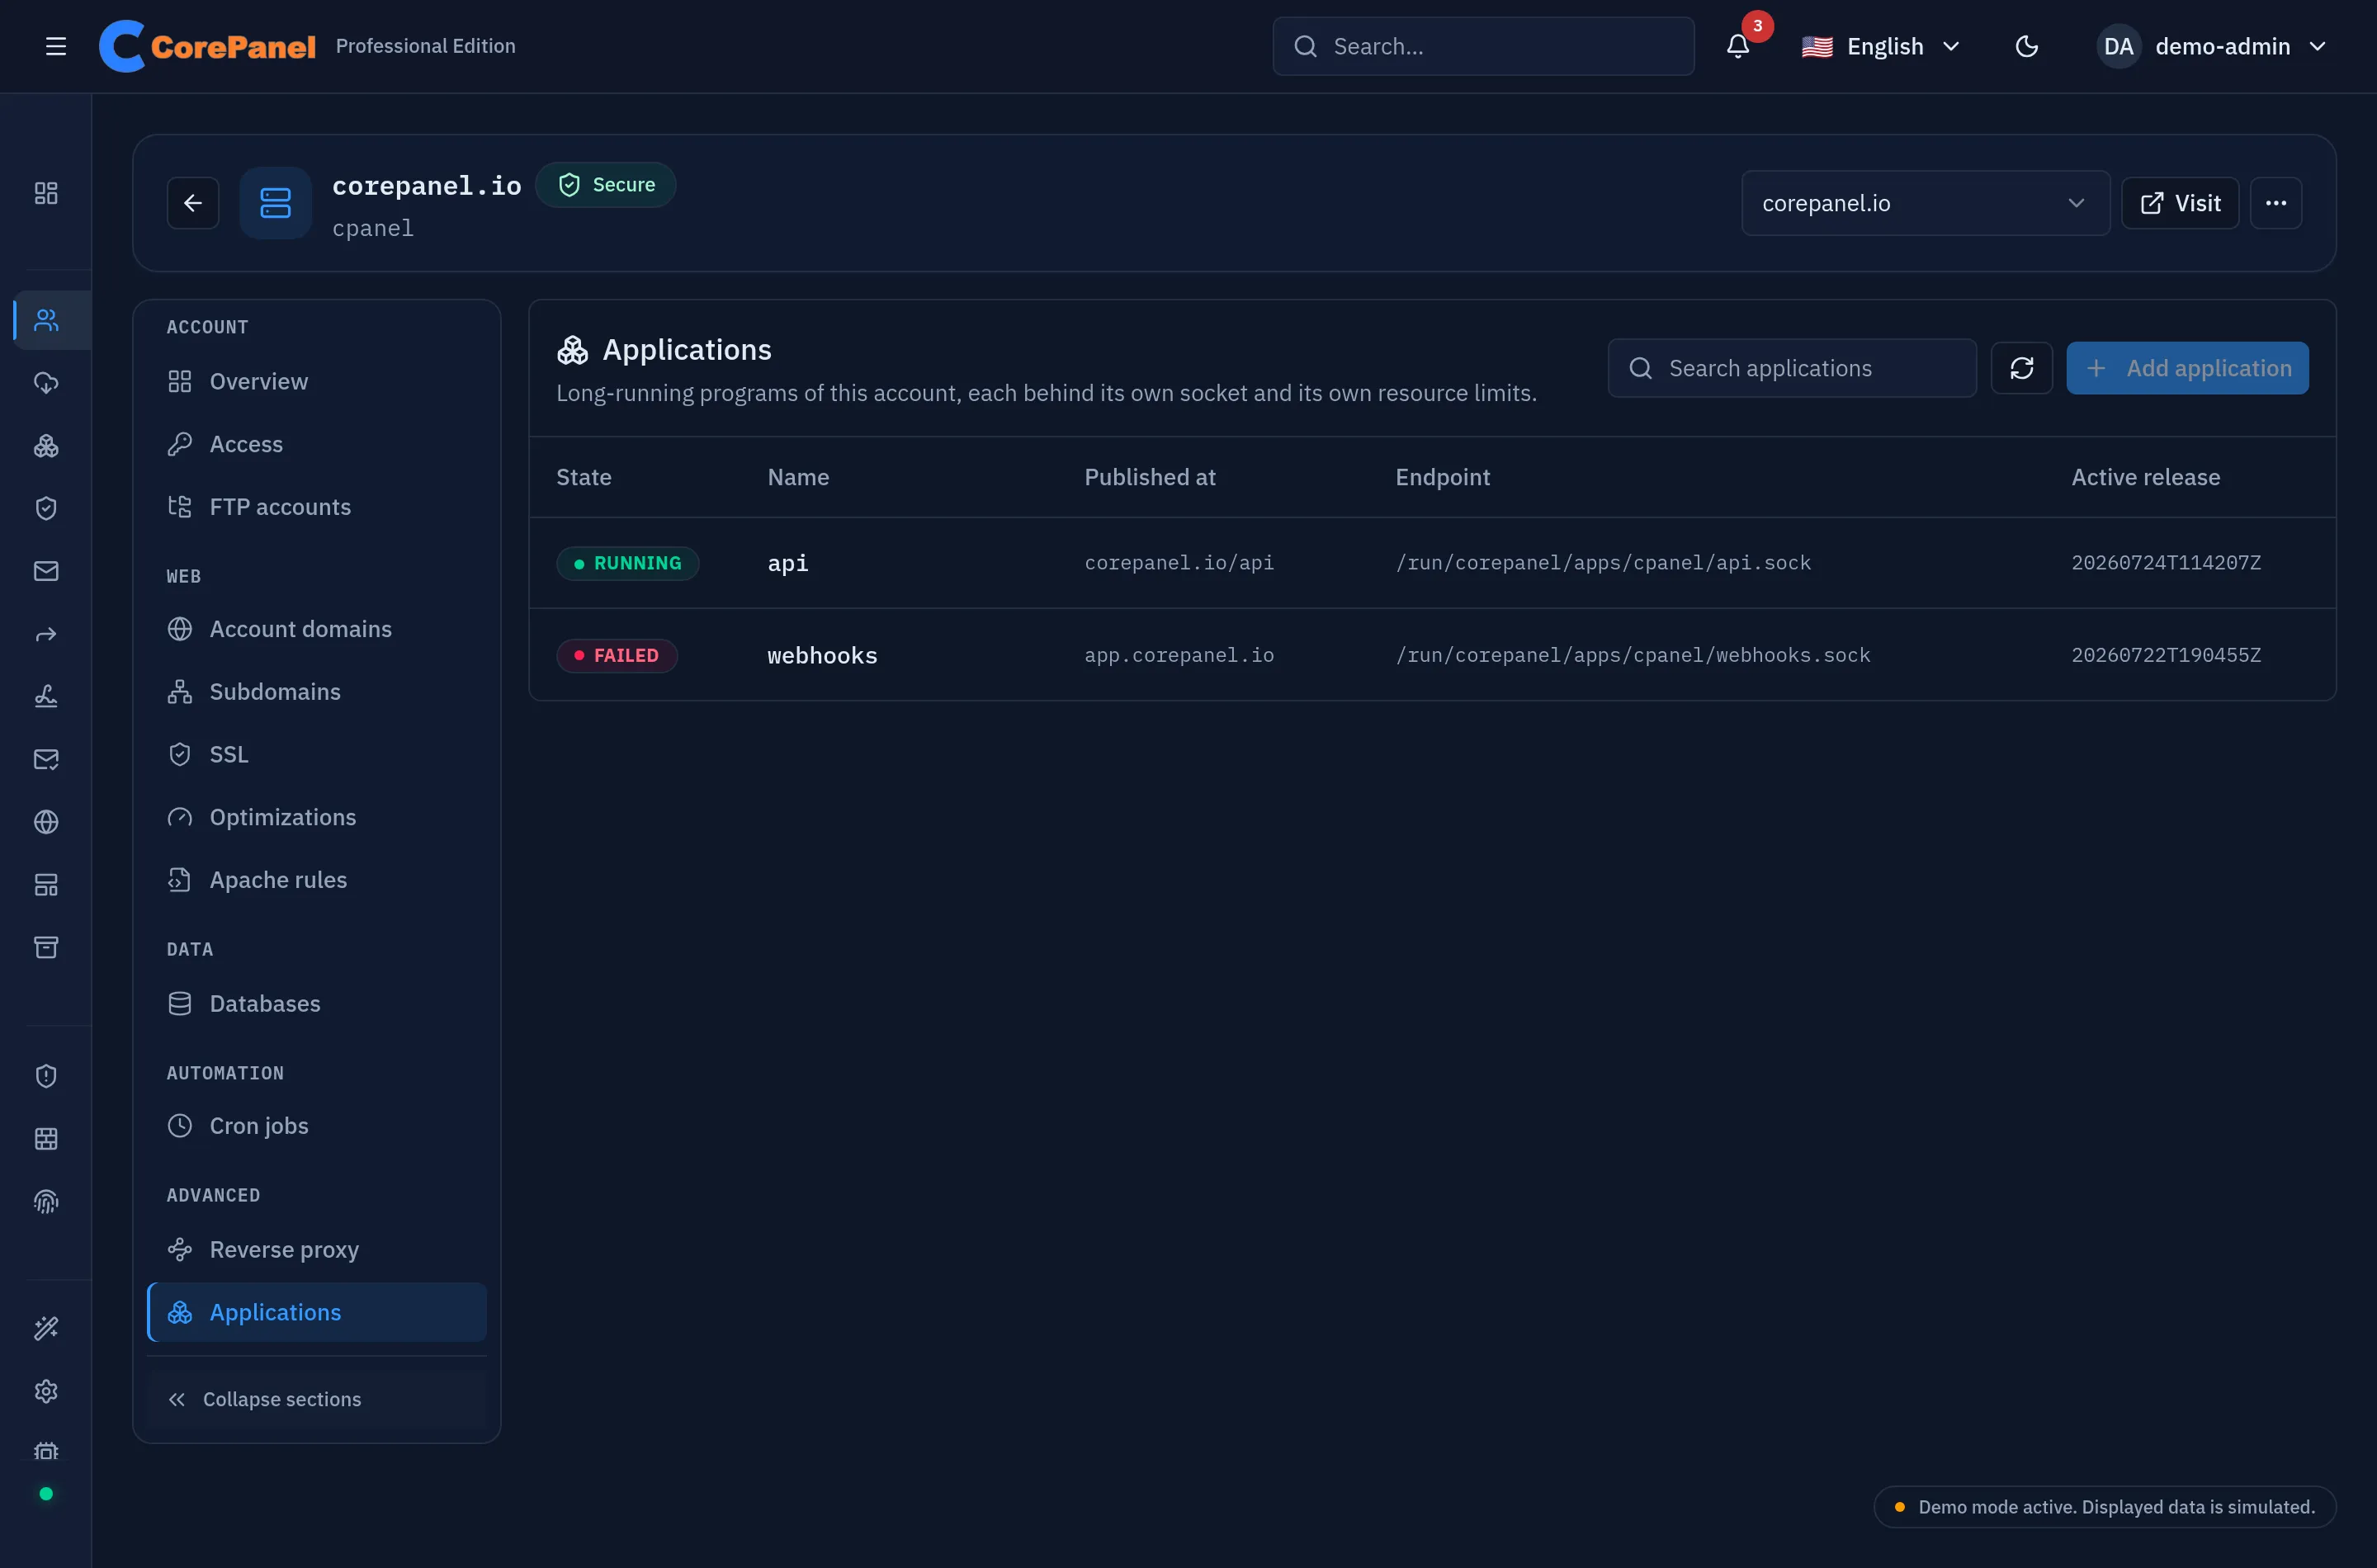
curl -fsS -X POST -H 'Content-Type: application/json' -d '{"text":"Hello from Go"}' https://app.example.com/api/notescurl -fsS https://app.example.com/api/notes | grep -F '"Hello from Go"'curl -fsS https://app.example.com/notes/1 | grep -F '<div id="root">'In the panel, the account’s Applications list shows api as Running, with the
socket it serves on and the release that is active. Open it for the live systemd status
(it refreshes itself), the releases you can roll back to, and Logs, the journal
that carries everything the program writes to stdout and stderr.
Or, from the command line, as root on the server:
corepanel app list exampleOptional: deploy the API on every push
When the project lives in a Git repository, the API can deploy itself. On the
application’s page, in the Deploy webhook card, press Enable. You get a token,
shown masked until you reveal it, and an upload URL. Store the token as a secret in your
CI, COREPANEL_DEPLOY_TOKEN, and add a job like this one to GitHub Actions:
name: deployon: push: branches: [main]jobs: api: runs-on: ubuntu-latest defaults: run: working-directory: api steps: - uses: actions/checkout@v4 - uses: actions/setup-go@v5 with: go-version-file: api/go.mod - run: CGO_ENABLED=0 GOOS=linux GOARCH=amd64 go build -o server . - run: tar czf api.tar.gz server - run: > curl -fsS -X POST https://panel.example.com/api/apps/upload -H "Authorization: Bearer ${{ secrets.COREPANEL_DEPLOY_TOKEN }}" --data-binary @api.tar.gzCopy the exact upload URL from the card: it uses your panel’s hostname. The call answers
202 as soon as the deploy starts, and the same health check and automatic rollback
apply. The result shows up on the application’s page. The token can deploy that one
application and nothing else, and Rotate token replaces it.
The webhook covers the API. The frontend has no deploy endpoint: from CI it goes up over
FTPS, for example with lftp -e "mirror -R dist domains/app.example.com".
When something does not work
| What you see | Why |
|---|---|
Reloading /notes/1 gives 404 | The subdomain is not in SPA mode. Change it in the subdomain’s settings. |
/api/... gives 404 from the Go program | The routes were written with /api in them. The prefix is stripped: route /notes, not /api/notes. |
| The deploy dialog says the release was rolled back | /healthz did not answer 200 in time. The log at the bottom of the dialog says why, and it stays on the application as Last failure. |
The log says connection refused to the database | The program connected over TCP. Use DATABASE_URL as it is, or CP_DB_SOCKET. |
| path must be in canonical form when saving the form | The start command begins with ./. Write server. |
fork/exec … permission denied in the log | The archive holds a script, not a compiled Go binary. Only Go binaries run today. |
| Add application is disabled | The account’s Applications limit is still 0. |
Your email lives in the same panel
A web application rarely comes alone: the project also needs info@example.com, a
support@ address, password-reset emails. On CorePanel that is the same panel and the
same account, not a second provider to pay for and keep in sync:
- Mailboxes and webmail for
example.comare created under the account’s Mail section, with their quotas, aliases and forwarders. The WordPress tutorial walks through it. - SPF, DKIM and DMARC are published for the domain when CorePanel runs its DNS, and incoming mail goes through the server’s spam filter.
- The application can send mail with no SMTP setup. It gets
/usr/sbin/sendmail, as PHP sites do, so a password-reset email from the Go program leaves the server as the account. No credentials to store, and the server’s log says which application sent it. See Sending mail.
One login covers the program, its database, its domain, its certificates and every email account behind it.
What you did not have to do
You did not write a systemd unit or an nginx block, open a port, configure TLS, create a
MySQL user, or write a rollback script. CorePanel did all of it for the account, and the
program runs as example, in a namespace of its own, under memory and CPU limits it
cannot exceed.
The Applications documentation covers the rest: persistent data in
$CP_APP_DATA, secrets in the environment, resource limits, and the other ways to publish
an application, such as one that owns a whole hostname.