Host a WordPress site with email, free SSL and nightly backups on CorePanel
Install WordPress on your own server in one command, give the domain working mailboxes and webmail, and schedule nightly backups you have actually tested — on AlmaLinux or Rocky Linux with the free CorePanel panel.
A WordPress site for a small business needs more than WordPress: a certificate, a contact address that works, and a backup you can restore from the day something goes wrong. This tutorial sets up all three on a CorePanel server, using the account created in Install CorePanel and host your first website.
At the end you will have:
- WordPress on
https://www.example.com, installed with a hardened configuration and a real cron job; - two mailboxes,
info@andeditor@example.com, with webmail; - a nightly backup of the whole account, files, database and mail, kept for a week, and one restore point taken before you change anything.
Everything is done in the panel, and every step also has its command for the shell. Run
the commands as root on the server.
Install WordPress
In the panel, open WordPress → Install WordPress, pick the example.com account and
fill in the site title and the first administrator. Leave the password empty and
CorePanel generates a strong one.
From the shell it is one command:
corepanel wp install example --domain example.com --title "Example Blog" --admin-user editor --admin-email editor@example.comInstalled WordPress at https://www.example.com (instance 1) Admin user: editor Admin password: XQzfOHYcaYYec9xOEI~K8voB (shown once — store it now) Database: example_wp (user example_wp)The install took about fifteen seconds. CorePanel ran WP-CLI as the account’s user, never as root, so every file belongs to the site. It also:
- created the database and its user, and wrote them into
wp-config.php; - wrote fresh salts and
FS_METHOD direct, so updates never ask for FTP credentials; - turned off WordPress’s visitor-triggered cron and created a real cron job that runs every five minutes;
- set the site address to
https://www.example.com, matching the domain’s canonical host, so WordPress and the web server never redirect each other in a loop.
Check that the site answers, and look at what was set up around it:
curl -fsS https://www.example.com/ | grep -o '<title>[^<]*</title>'corepanel wp list examplecorepanel cron list examplegrep -E "DISABLE_WP_CRON|FS_METHOD" /home/example/public_html/wp-config.phpThe first line prints <title>Example Blog</title>. The cron list shows one job,
*/5 * * * *, which runs wp cron event run --due-now for the site as the account’s
user.
Harden it, and keep it updated
The install already applied CorePanel’s hardening set. See it:
corepanel wp hardening example 1MEASURE PROTECTIONfile-editor onxmlrpc onversion-hiding onuser-enumeration onapp-passwords offon means the protection is active: the theme and plugin file editor is disabled,
XML-RPC is blocked, the WordPress version is hidden and ?author=1 cannot be used to
list user names. Application passwords stay allowed, because the WordPress mobile app
and some integrations need them; turn them off with
--set app-passwords=on if nothing uses them.
Then decide how WordPress core updates. minor installs security and maintenance
releases on their own and leaves major versions to you:
corepanel wp policy example 1 minorWhen you update core from CorePanel (Manage → Updates, or
corepanel wp update example 1 --core), it takes a restore point first, files and
database, so a bad update is undone with one rollback.
Log in without a password
Log in in the WordPress list opens the dashboard directly: CorePanel asks WordPress for a one-time link that expires in about a minute. Nobody has to share or reset a password to fix a customer’s site.
corepanel wp login example 1Create the mailboxes
In the panel, open the account, then Mail → Email accounts → Add mailbox. Enter the
local part (info), a password and a quota in MB. Repeat for editor.
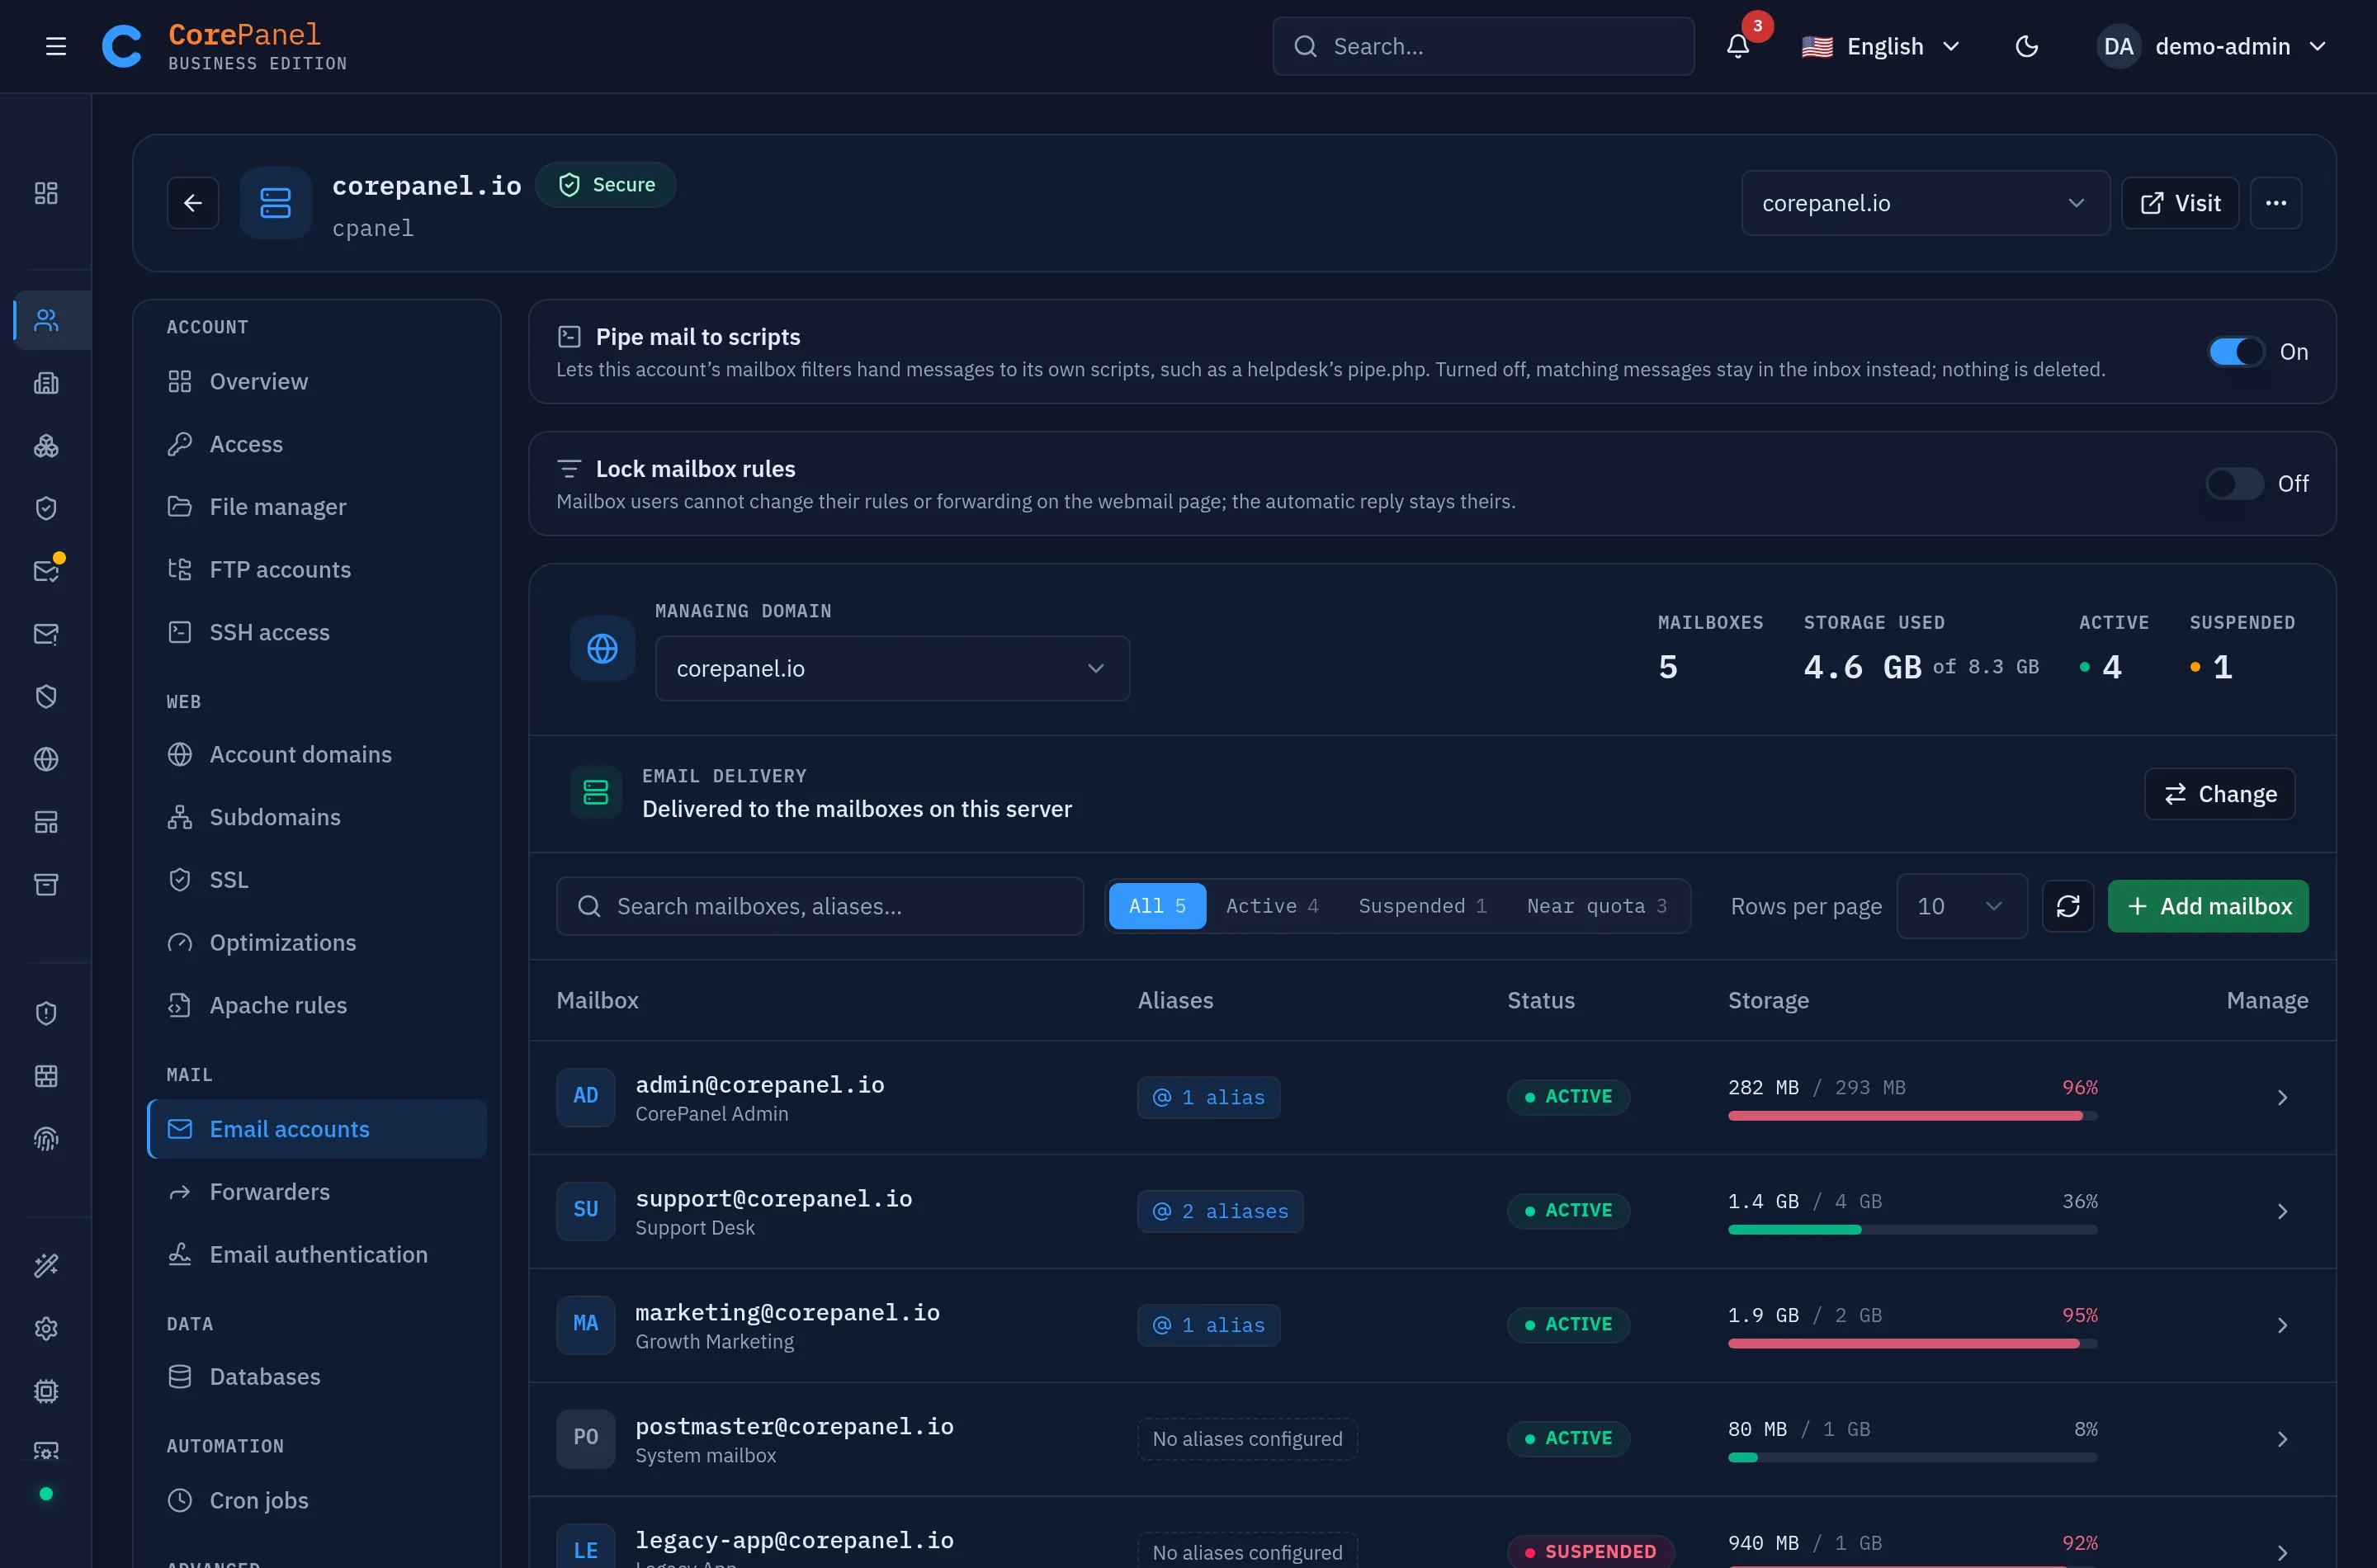
The command line lists them, and can change quotas, suspend or delete them afterwards:
corepanel mail list example.comeditor@example.com active quota=1024 MBinfo@example.com active quota=2048 MBNothing else needs configuring. The domain already has its MX record, its SPF record
and a DKIM key from when the account was created, and the wildcard certificate covers
mail.example.com and webmail.example.com.
Settings for a mail app
| Server | Port | Security | |
|---|---|---|---|
| Incoming (IMAP) | mail.example.com | 993 | SSL/TLS |
| Outgoing (SMTP) | mail.example.com | 465 (SSL/TLS) or 587 (STARTTLS) | Password |
The username is always the full address, info@example.com. For a browser, send the
mailbox owner to https://webmail.example.com.
Send a test message
Send a message from editor@ to info@ the way a mail app does it, logged in on the
submission port, then read it back over IMAP. swaks is a small SMTP testing tool from
EPEL, which CorePanel enables:
dnf -y install swaksswaks --server mail.example.com --port 587 --tls --auth LOGIN --auth-user editor@example.com --auth-password 'Quiet-Harbour-2026!' --from editor@example.com --to info@example.com --header "Subject: Hello from WordPress" --body "It works."timeout 60 bash -c "until curl -fsS --url 'imaps://mail.example.com/INBOX' --user 'info@example.com:Lantern-Cove-2026!' -X 'SEARCH SUBJECT Hello' | grep -q 'SEARCH [0-9]'; do sleep 2; done"curl -fsS --url 'imaps://mail.example.com/INBOX' --user 'info@example.com:Lantern-Cove-2026!' -X 'SEARCH SUBJECT Hello'The last line prints * SEARCH 1: the message arrived in info@’s inbox, and IMAP
answered over TLS with the domain’s own certificate. To make WordPress send its own mail
(contact forms, password resets) through editor@, use any SMTP plugin with the
outgoing settings above.
Schedule nightly backups
A backup is only real once it runs on its own and you have seen what is in it. In the
panel, go to Backup & Transfers → Schedules → New backup schedule: target the
example.com account, frequency Daily, keep the last 7.
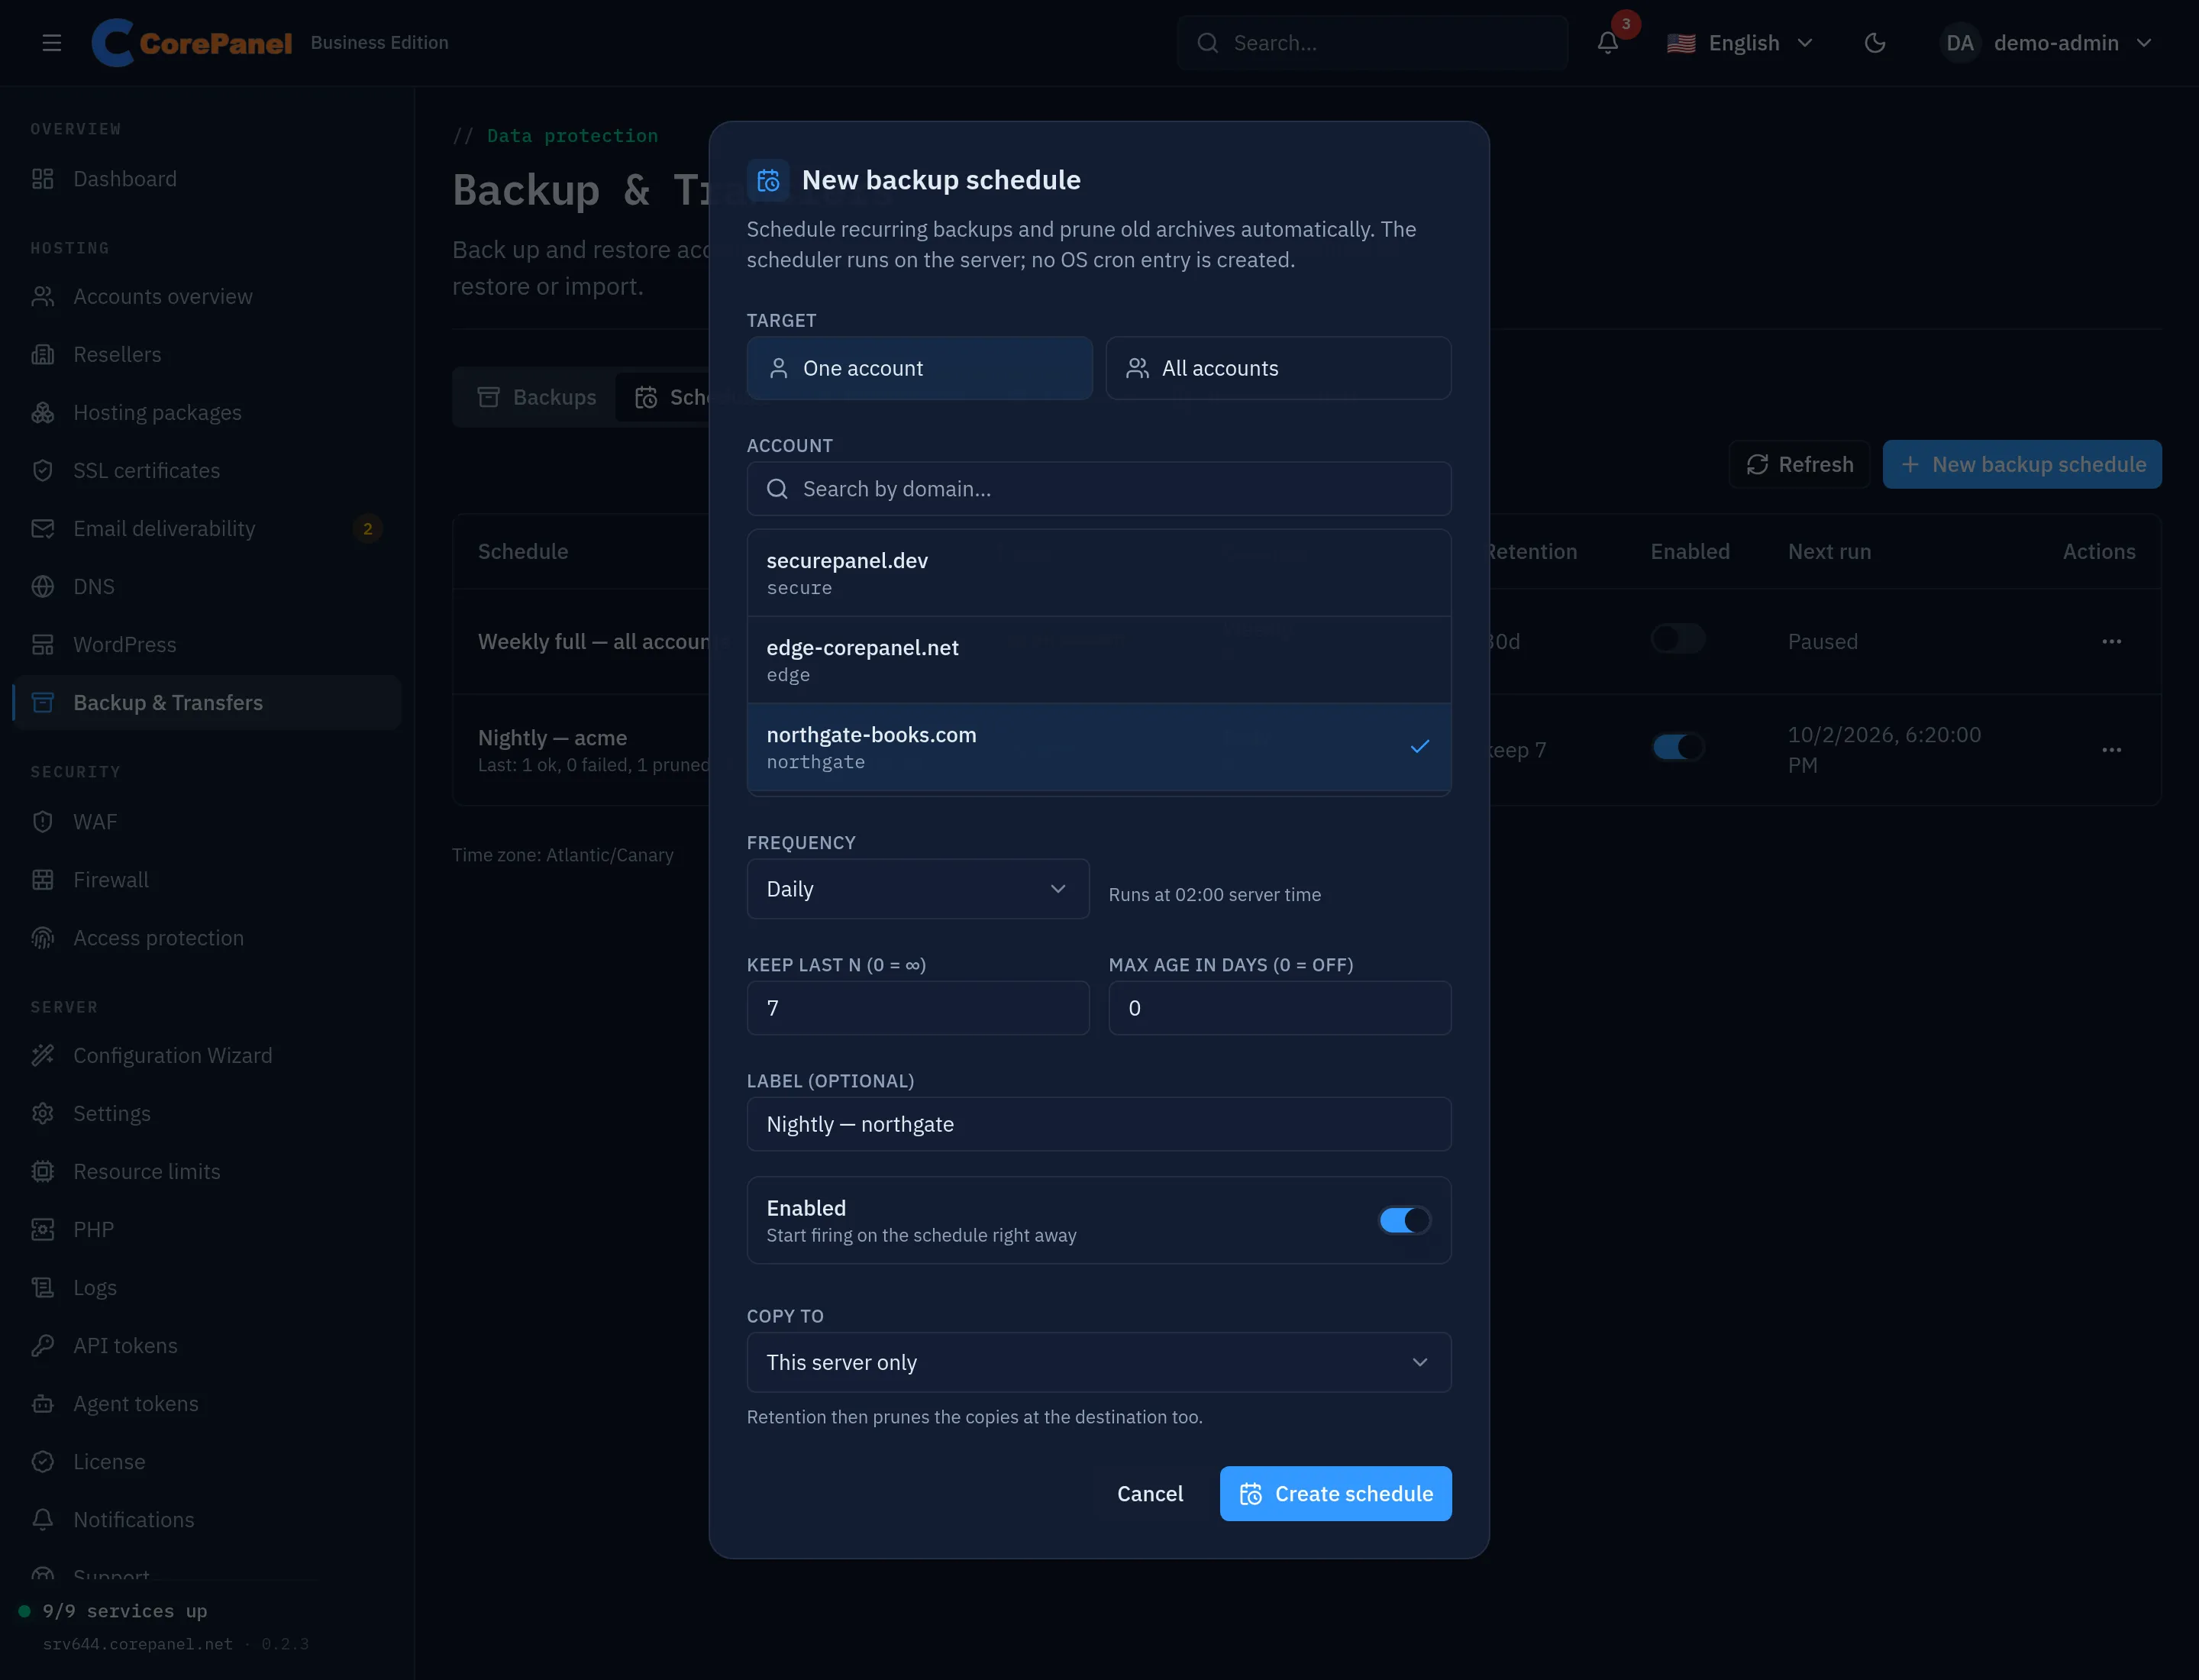
The same schedule from the shell:
corepanel account backup-schedule create --user example --frequency daily --keep 7 --name "example nightly"Backup schedule 1 created (example, cron "0 2 * * *", next run 2026-10-06 02:00 UTC)It runs at 02:00 server time and keeps the seven newest archives, pruning older ones it made itself. It never deletes a backup you took by hand. The scheduler runs inside CorePanel, so there is no crontab entry to lose.
Do not wait until tomorrow to find out whether it works. Run it now:
corepanel account backup-schedule run 1timeout 600 bash -c 'until corepanel account backup-status 1 | grep -q "finished: completed"; do sleep 5; done'corepanel account backup-contents --job 1Account: example (example.com) — exists hereHome: 3810 files, 105 MiB — browsable (corepanel account backup-files)Database: example_wp (0 MiB, 1 user(s)) — exists hereMailbox: editor@example.com — exists here [INBOX]Mailbox: info@example.com — exists here [INBOX]Config: dns (1)...The first backup on a server is job 1, which is why backup-status and backup-contents
can name it. Later ones are listed under Backup & Transfers → Backups with their job
number.
One archive holds the site’s files, the WordPress database, both mailboxes with their messages, and the account’s DNS, SSL and settings. From it you can restore the whole account, even onto another server, or only one file, one database or one mailbox: Backups → Restore.
Take a restore point before you change things
Backups protect the account. For the next hour of work on WordPress, before a big plugin update or a theme change, a restore point is faster: a snapshot of this one site’s files and database that rolls back in one step.
corepanel wp restore-point create example 1corepanel wp restore-point list example 1CorePanel keeps three per site. They are a safety net for changes, not backups: they live on the same server and are not kept after the account is deleted.
What you have now
| Site | https://www.example.com, WordPress managed from WordPress in the panel |
| Admin access | One-time login links, or the generated password |
info@ and editor@example.com, IMAP and SMTP on mail.example.com, webmail on webmail.example.com | |
| Backups | Every night at 02:00, seven kept, tested once |
| Before risky changes | A restore point, three kept per site |
Next: secure the server with the firewall, the WAF and SSH protection.